Table of Contents
Introduction
I recently picked up a HackRF to learn more about SDR and RF in general. The HackRF seemed like a great choice for getting started learning about SDR, especially given the wide range of content for learning SDR and signals processing with it, along with the Portapack for using it without a computer. I decided to start with Michael Ossmann's Great Scott Gadgets SDR Course, and hit the ground running, or at least attempted to.
Getting GNURadio installed for the first lesson initially seemed straightforward, but I ran into a couple of snags and wanted to share the resolution for anyone else that might be using a HackRF on MacOS.
Most of this tutorial is sourced from the GNURadio installation guide.
Getting Started
While it might be tempting to use Homebrew to install GNURadio, I found that the Homebrew install was missing some components that were used in the first lesson, namely the osmocom Source block. I then set off to install the gr-osmosdr module from source, which seemingly went fine, but I honestly didn't have a clue where to set the library path so that GNURadio could find the module. I found that I could install GNURadio and gr-osmosdr via MacPorts which I wasn't too keen on, so I poked around a bit more and found that GNURadio and gr-osmosdr (packaged as gnuradio-osmosdr) could be installed using Anaconda. This simplified the installation process and everything was up and running in no time.
Installing MiniConda
I didn't want the full Anaconda distribution, so I opted to install MiniConda, which is a minimal installer for Anaconda which primarily includes the package and virtual environment manager, conda. If you don't have a Homebrew installation of Python, start by installing the latest with Homebrew:
brew install python3
Next use Homebrew again to install MiniConda:
brew install miniconda
Installing GNURadio and gnuradio-osmosdr
With miniconda installed, we can use it to install gnuadio and the gnuradio-osmosdr module:
Start by creating a new conda environment:
conda create -n gnuradioActivate the new environment:
conda activate gnuradioInstall GNURadio and gnuradio-osmosdr:
 conda config --env --add channels conda-forge
 conda config --env --set channel_priority strict
 conda install gnuradio gnuradio-osmosdr
Installing HackRF Tools
If you haven't already, make sure that you install the HackRF tools:
brew install hackrf
This includes the hackrf_info which is useful for verifying that your HackRF is connected and working properly:
❯ hackrf_info
hackrf_info version: 2023.01.1
libhackrf version: 2023.01.1 (0.8)
Found HackRF
Index: 0
Serial number: <redacted>
Board ID Number: 4 (HackRF One)
Firmware Version: n_230813 (API:1.07)
Part ID Number: <redacted>
Hardware Revision: r9
Hardware appears to have been manufactured by Great Scott Gadgets.
Hardware supported by installed firmware:
    HackRF One
It also provides the hackrf_spiflash utility for flashing new firmware. If you haven't done this already, check out the instructions in the docs: Updating Firmware.
Trying Out GNURadio
To verify that everything is installed correctly, open gnuradio-companion from with your gnuradio conda environment activated. You should see something like this:

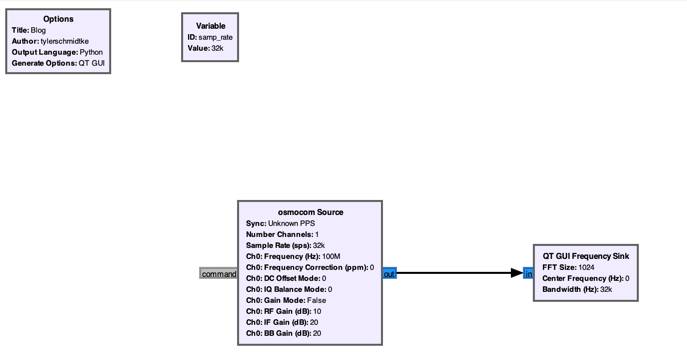
Click the Search button in the menu bar and search for osmocom Source in the blocks library on the right. You should see the osmocom Source block in the list. Drag it onto the canvas. Next double click the osmocom Source block to open its settings. Verify that the Sample Rate is set to samp_rate to reference the predefined variable and set the Ch0: Frequency (Hz) to 10e6 to set the frequency to 10 MHz. This is the frequency that the HackRF will receive.
Next, search for QT GUI Frequency Sink and drag it onto the canvas as well. Finally, connect the two blocks by clicking and dragging from the output of the osmocom Source block to the input of the QT GUI Frequency Sink block. Finally, click the Options block that is on the canvas by default and set an id. Your canvas should look something like this:
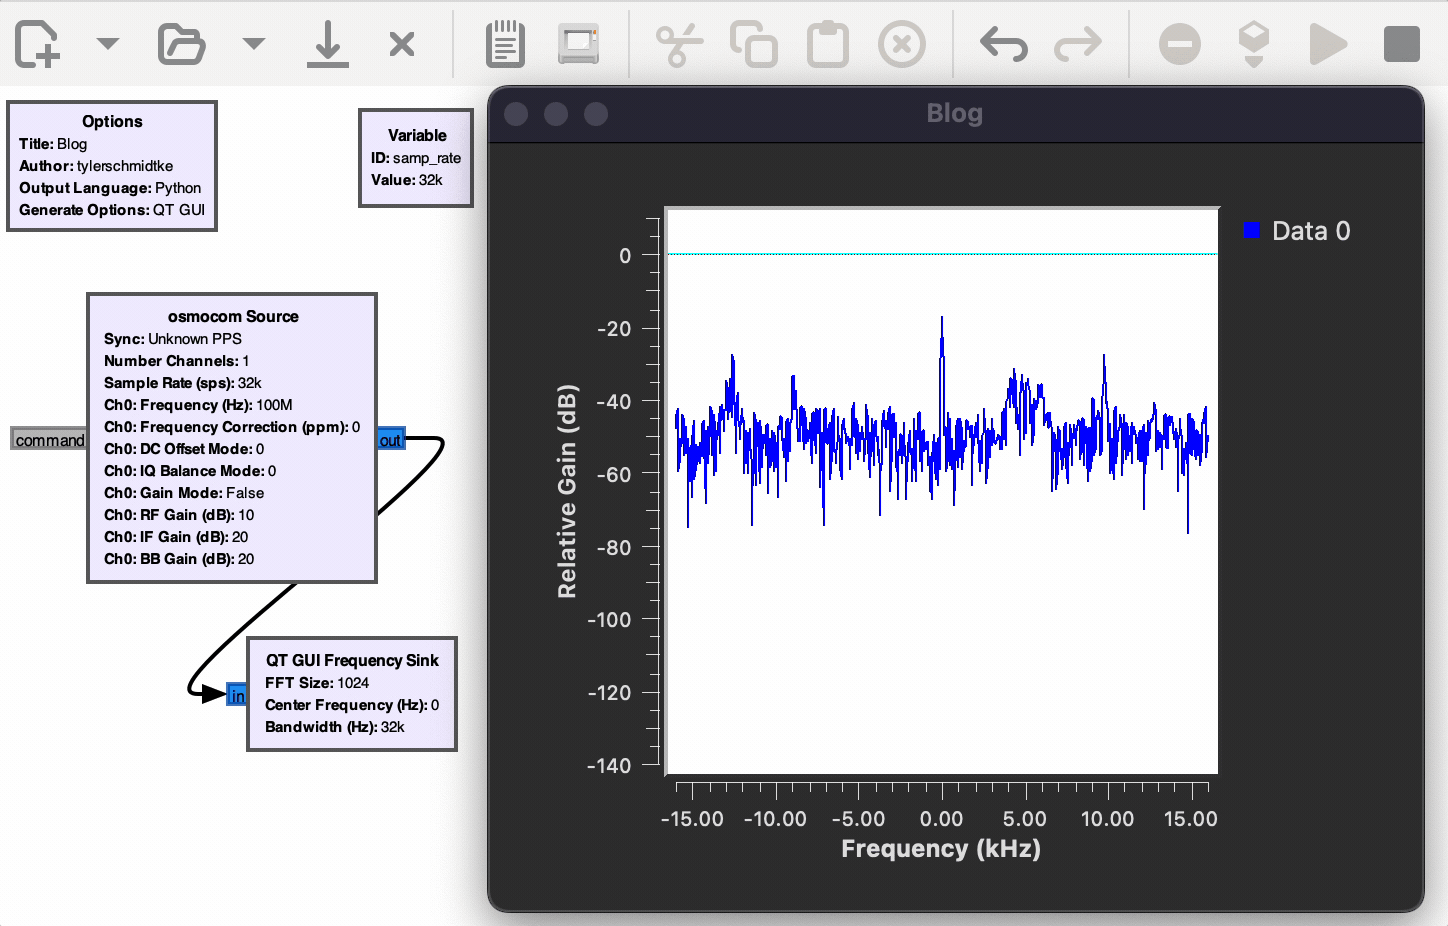
Click the Play button in the menu bar to start the flow graph. You should see a window open with a frequency graph:
Conclusion
If you found yourself here after getting a HackRF of your own, I hope this saved you some time getting started. Happy hacking!